

The Diced Tomatoes Felted Purse
 This is a felted purse I came up with to use up some Paton's Classic Merino yarn I had on hand. I based the measurements on a favourite green leather purse I have. It's finished measurements are about 11" long by 5" dia (13" around).
PLEASE NOTE: This is a free pattern intended for individual use. Please do not publish this pattern for sale or knit the purses for sale.
SUPPLIES NEEDED:
- Yarn: 3 balls of Paton's Classic Merino in 3 different colours (A, B and C). If you want to use this pattern as a "stashbuster", the purse uses about 70g each of A and B and 45g of C, for a total of about 185g (7 ounces) of wool.
- 10mm (US #15) needles (you will need double points or circs for the I-cord)
- large eyed tapestry or yarn needle
Cast on 42 sts using two strands Colour A. Knit back and forth in stocking stitch for 8 rows. Change one strand of yarn to Colour B. Continue in stocking stitch as follows:
AB - 5 rows
BB - 8 rows
BC - 5 rows
CC - 8 rows
BC - 5 rows
BB - 8 rows
AB - 5 rows
AA - 9 rows (the 9 is not a typo)
*Now you are going to begin Side 1. With the wrong side facing you thread a contrasting yarn through all the purl bumps on the row 5 rows down. This will make them easy to find for the next step.
Next Row (WS): Pick up purl bump of next st, 5 rows down, and p this st tog with next st on needle to end of row. This will form a ridge that looks like I-cord on the right side of the work and give a nice defined end to your purse.
Side:
NOTE: when changing colour on side leave a tail as you cut the yarn for sewing up the sides in the appropriate colour when finished.
Row 1 (RS): Colours AA - (Ssk, k2, k2tog) to end. 28 sts rem.
Row 2 (WS): Colours AB - P all sts.
Row 3 (RS): Colours BB - (Ssk, k2tog) to end. 14 sts rem.
Row 4 (WS): Colours BC - P all sts.
Row 5 (RS): Colours CC - (Ssk, k2) to last 2 sts, ssk. end.10 sts rem.
Row 6 (WS): Colours CC - (P2tog) to end.
Break yarn, leaving a long tail for sewing up side seam. Draw yarn through rem 5 sts on needle, pull tight. Sew up side seam only, changing yarn to match colours using the tails left.*
Pick up and knit 42 sts from cast on edge. Continue as for Side 1 (between the *'s) to make Side 2.
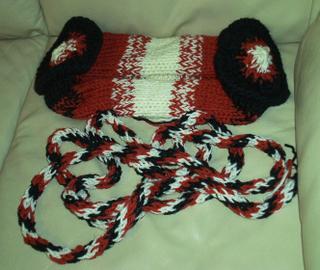
Make a 10 foot I-cord as follows:
Using the 10mm (US #15) double point or circular needles but only 1 strand of yarn thick, cast on as follows: 2A, 2B, 2C. Continue I-cord rotating the colours one stitch to the left each row, pulling the yarn from the last stitch knit to knit the first stitch of the following row. Your pattern will look like this:
A A B B C C
A B B C C A
B B C C A A
B C C A A B
C C A A B B
C A A B B C
FELTING
Now we felt the bag. I find my felting works better without putting it in a bag or pillowcase, but others prefer to use that method. I put a squirt of dishsoap on the purse and toss it in the washing machine along with the I-cord handle and a couple of heavy items like towels or jeans. If using towels make sure you don't use something dark that will leave towel-coloured lint all over your project.
I set the machine to a hot wash cold rinse cycle and run hot water in the laundry tub to make sure there's no cold water in the lines before starting. I have a front loader that doesn't use a lot of water, so if you are using a top loader you might not need to do that step. This purse was run through the heavy duty cycle (about a 15 minute cycle) twice, complete to final spin. You may want to check your project periodically to get the desired size as your mileage may vary. I was aiming for a purse just big enough to cram a couple of 28oz cans into and a finished I-cord of about 6 feet.
BLOCKING
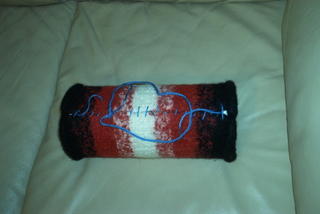
After felting but still wet I crammed two 28oz cans of diced tomatoes (hence the name, but any 28oz cans of produce will do ;) ) into the purse and worked the fabric with my hands to stretch it to a nice flat shape on the ends. Then I took some contrasting yarn to sew up and stretch the purse around the cans until dry to keep the shape.
FINISHING
Once dry, cut the contrasting thread and remove the cans. Trim the ends of the I-cord neatly, butt them up end-to-end and sew them together and attach them to the purse following the division between colours AB and BB as shown. Sew them up to halfway up the side of the purse.


Sew in a zipper for closing using blanket stitch, and braid a doubled strand of each colour for a pull tab on the zipper. Line the bag if desired.


Please post pics of your finished Diced Tomatoes! :)
© 2005 Jacqui Cardillo
posted by Jacqui | 10:07 AM
![]()
3 Comments:
You're welcome! I'm just happy to finally have something to "give back" to the online knitting community after all I've learned here.
that is very cute darlink...
I love stuffing the cans into it to shape it
vi
WOW!!!!! That is so wierd and cool at the same time!!!!!!!! I so luv it!!!!!!!!!!! lol
Post a Comment
<< Home